Categories
Lawn & Garden

Turn That Small Space Into A Garden

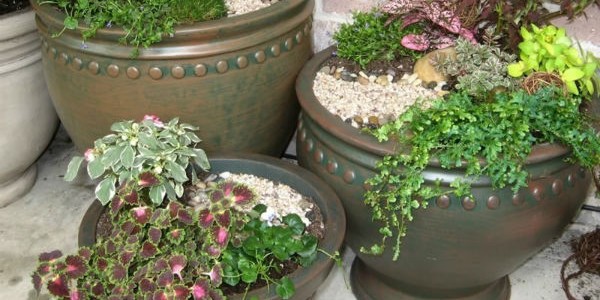
If you’ve always loved plants but never had any because you don’t have enough space for a garden, think again, because you absolutely do. You don’t need a huge backyard to start growing your own plants. A little creativity goes a ling way.

planters-garden-hanging-cute

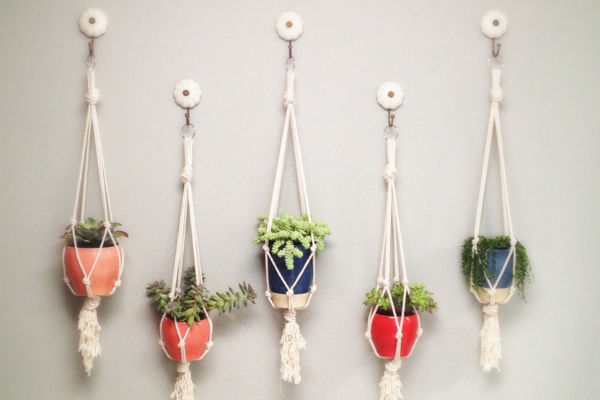
Use your vertical space – Hang your planters. You can find some very pretty decorative planters to hang from the ceiling or make some yourself. And you don’t even have to settle for a hue macrame pot, depending on the plants you want, smaller, cuter containers can work just as well. And you can use recycled materials to make them too! And your vertical space doesn’t end with your ceiling. Your walls are a great place to hang pots and planters too. Let your creativity flow and organize your planters in a stylish way to make your tiny garden part of your living room decoration.

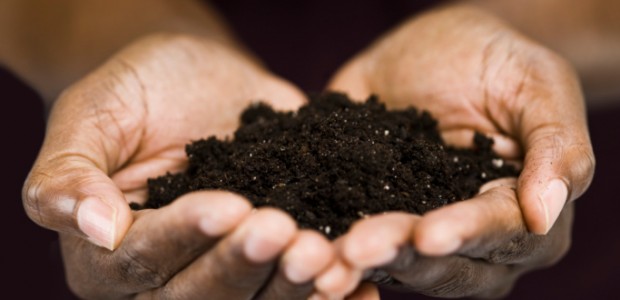
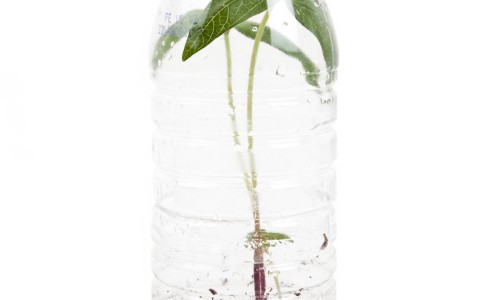
Recycle water bottles to make planters – Instead of wasting valuable space with planters that require big trays at the bottom, make your own recycled self-watering planters out of old water bottles. You need a 2-liter water bottle, cut it in half and puncture three little holes near the top of the bottle, just below the neck. Insert a couple of 4” strips of wicking fabric in the neck and turn that part upside down. Fill it almost all of the way up with soil-less potting mix and organic fertilizer, and make sure is damp. Now plant your seeds, add some water to the base of the bottle and insert the other half, neck down into the base.

Use your bathroom – We never think of bathrooms as a place to keep our plants, but there’s no reason not to do it. Some indoor plants like bamboo, spider plants and ferns are perfect for bathrooms, since they love humid places. You will enjoy some green on your morning routine and even a tiny bathroom will feel cozier with a plant.

Get some vines – Indoors or outdoor, vines are perfect plants for small spaces, since they grow up and only spread to the space they have available. They will dress up your walls, add some much needed green to your life and, if you decide to let it grow indoors, it will be the most eco-friendly decoration and a conversation starter.

Make a terrarium – You don’t even need a huge container to make a terrarium, it just has to be clear. Mason jars are perfect for this. They look super cute, they don’t take up a lot of space and they already have lids, so you can keep pests away from your precious plants. Mason jars are a big trend in interior decorating and because of their small size, you can place them on your desk, and any other well-lit spot, to bring some green to every room in your house.

Categories
Eco Tips Lawn & Garden Recycling

Composting 101: Start A Compost Pile At Home

Every house with a garden or a backyard should have its own compost pile. Why? Because organic materials make up 30 percent of what we throw away. If you compost them, we turn them into precious nutrients for your plants and vegetables. If you don’t, then they end up as trash and take up space in landfills, where they also release greenhouse gases.

woman-compost-pile-bin-garden

Basically, composting is an essential way to reduce your carbon footprint significantly. Not only does it reduce methane emissions from landfills, it also enriches your soil, to help your plants grow stronger. You will need to use less chemical fertilizers (or none at all), and, since it suppresses plant diseases and pests, you will use less pesticides as well. So why isn’t everyone composting yet?

It’s not difficult to start your own compost pile at home. You already have all the ingredients, you just have to create a new routine, instead of throwing them away, you add them to your compost pile. Compost has three basic ingredients: Browns, which include branches, twigs and dead leaves. Greens, which include vegetable waste, fruit scraps, coffee grounds and grass clippings. And water, that will help break down the other materials and turn them into compost.

The first step is to select a dry, shady spot for your pile or bin. If you don’t have space outside, you can use an indoor compost bin that you can find in any hardware store. Don’t worry, a properly-made compost pile will not smell nor attract pests. If you decide to do an outdoor pile, place it on bare ground, so worms and other organisms can enter your pile and help it along.

The second step is to add to the pile. Try to keep an equal ratio of green and brown ingredients, and make sure your pile is always damp. However, keep in mind that there are ingredients you should never compost, such as oils, meat products, milk, eggs, manure from meat-eating animals and plant clippings that have been treated with chemicals or diseased.

Once you have your compost pile going, you’ll want to keep it covered to retain moisture. You should also turn the material every too weeks at least, to help speed up the decomposing process. Use a pitchfork, a shovel or any tool you think will help, and mix and invert your pile. If you consider it seems a little bit dry, you can spray it a bit with a hose as you are turning it, to keep your pile moist. When the material at the bottom is dark and rich in color, with a texture similar to soil, then it will be ready to use. The time it takes depends on the size of your pile and the materials you add but it usually takes from a couple of weeks to months.

Categories
Articles Lawn & Garden Recycling

Turning Your Backyard Into a Green-Living Haven

No home is complete without a spruced up backyard. Even if this outdoor area is rather small, with the right touch, it can look better than ever before, and more importantly, it can be used as a versatile form of living space. From outdoor kitchens to in-ground swimming pools, there are many ways to make use of a backyard. And best of all, there are many green-friendly techniques you can follow to ensure you turn your backyard into a green-living haven.

Revamp Your Used Furniture

Your current outdoor patio furniture may seem a bit worn out, but by upcycling these pieces, you’ll be well on your way to revamping them into completely new pieces. From adding a fresh coat of paint to replacing the cushions, there are many affordable and eco-friendly methods for sprucing up old furniture and extending its longevity.

Be Cautious with the Way You Plant Flowers and Trees

If your backyard is spotted with plants, flowers and trees that require lots of water, you’ll at least want to group these together. In doing so, it will be easier to water these areas on a more consistent basis than you do other areas of the yard. Not only does this help conserve water, but it will do wonders for your water bill.

Do the Work Yourself

One of the best ways to create a backyard haven in a green-friendly way is by doing the work yourself. From raking the yard to digging holes to planting flowers, when you do things yourself, this allows you to accomplish your tasks in the greenest manners possible. And in addition to taking lots of pride in the end-product, you’ll also save a ton of money by doing the work yourself. Do keep in mind, though, that maintaining your backyard will take lots of work; it will need your attention all year long.

Categories
Articles Eco Eats Eco Tips Uncategorized

Ways to Preserve Summer’s Bounty

It might be hard to believe, but the end of the growing this summer’s growing season is right around the corner. Many of the fruits and vegetables are reaching their peak and must be picked now before they begin to wither on their vines or stalks. In order to enjoy the benefits of summer’s bounty, there are a few tricks and tips to implement now.

Freeze

One of the best ways to extend your enjoyment of summertime foods is to freeze them. Quick and easy, freezing foods at the peak of their freshness helps retain their vibrant colors and superior nutritional value. To freeze berries, gently wash them in cool water before patting them dry and lay them on wax paper-lined cookie sheets in a single layer. After they are frozen, place in a freezer safe container or bag, making sure to remove all the air first, before closing it securely. This method works for all berries except for blueberries. Washing them before freezing makes their skins tough so avoid doing so. Just be sure to do so before using them later.

Zucchini and other vegetables can be shredded so they can easily be added to baked goods and savory sauces before being placed in freezer safe bags. Be sure to label storage containers and bags with the type of food and the date.

Canning

Canning allows you to turn the berries, cucumbers and peppers you pick this summer into delicious, fresh-tasting condiments that can be enjoyed by your whole family, even when the season is over. Today, there is an array of different methods you can use to can different foods. Whether you want to go the traditional route and can foods using a pressure cooker or you want to try one of the newer no-cook methods, be sure to follow the directions carefully in order to ensure optimal results.

Be sure to have fun experimenting with the best ways to preserve summertime crops. Taking the time to do this now will ensure that you can enjoy the taste of fresh foods, even in the dead of winter.

Categories
Articles Lawn & Garden Uncategorized

Getting Your Yard to Look Marvelous In a Budget-Friendly Manner

A large number of homeowners take a great deal of pride in their lawns. If you happen to be one of these people, there’s no need to stress about taking care of your lawn even if you’re on a budget. Let’s take a quick look at a few budget-friendly tips you can follow to keep your lawn looking its best all year long.

Swap out your services

If you have time to mow your own lawn, then by all means you should. If, however, time doesn’t permit, then you’ll need to hire someone to mow it for you. Unfortunately, paying for lawn mowing services can get quite expensive. Think about it, if you hire someone to mow your lawn for $50 a week, that’s still $200 a month, sometimes $250.

To avoid having to pay for lawn care, you could swap out your services. For example, if your lawn care guy has kids, you could offer to babysit one to two days/nights a week in exchange for mowing your lawn. It’s a win-win for everyone.

Make sure your lawn is mowed in the right manner

When mowing your lawn, it’s best to leave the mower blades high. In doing this, the grass will grow deeper roots, which means your grass will not only be thicker but healthier too.

Quit wasting time picking up any clippings

After your lawn gets mowed, it may be tempting to pick up any loose clippings. In all actuality, though, it’s best to leave them sitting as they are because they will eventually start to breakdown, which means they’ll be contributing nitrogen to your lawn and serve as a free form of grass fertilizer.

Plant your own flowers

Instead of paying a landscape specialist thousands of dollars to plant shrubs, trees and flowers, consider doing the work yourself. There are many free, online tutorials that you can use to walk you through all involved planting steps, and best of all, you’ll be able to take much pride in your yard once the work is done.

Water your lawn in the morning

According to Keypointapp, it’s best to water your lawn in the morning. The grass will soak up the water, and any excess water will evaporate before the day ends, meaning it’ll be less likely that fungus will form on your lawn.

Categories
Eco Tips Lawn & Garden Uncategorized

Low-maintenance, low-water: Herb and flower spiral garden

It is a challenge for gardeners in hot climates to maintain a working food or flower garden without using a ton of water. With water shortages prevalent throughout the south, it is important to consider planning your garden with water conservation in mind. Not only will it help the environment, it will preserve the health of your soil and vitality of your crop.

A common problem with over-head watering is the salt that builds up in the dirt from evaporation. When garden water evaporates, it leaves salts and other trace minerals behind which eventually can have negative consequences for the soil, which was one of the main problems during the great depression and the famous dust bowl .

There are a number of steps you can take to assure that minimal water will be wasted, while getting a maximum yield from your crop whether that is flowers or food.

A great way to conserve water is through the manipulation of the garden plot. To build a low water herb spiral, you’ll want to dig a bowl-shaped hole in the desired location. Pick an area of yard with adequate sunshine for a good portion of the day.

  • Dig the circle down about a foot deep and about three feet in diameter. You’ll want to have enough room for all of the herbs or flowers you plan to sow, making sure to leave at least 6 inches between each plant, also accounting for the width of that plant.
  • Layer about 4″ of gravel on the bottom, building a rock spiral off of that foundation. Fill the remaining structure with good quality potting soil. The gravel will hold the water at the bottom, keeping the soil at a regular moisture level without over-saturating.

This and other techniques can be utilized to conserve water without a bunch of consistent hassle. Just dig the spiral, lay the gravel, do some initial watering sufficient for transplanting, and watch it grow. This low maintenance herb spiral will last a long time, and collect rain water without any help from you. Happy gardening!

Categories
Lawn & Garden Uncategorized

A Quick Guide to Natural Soil Amendments

Good gardens begin with great soil. While soil testing and appropriate fertilizer application go a long way to help plants flourish and produce a bountiful harvest, it isn’t always enough to only worry about nutrient levels. Great soil is fluffy, resists compaction, and lets water drain away at just the right pace to prevent wet roots or thirsty plants. If your soil is heavy and hard or too light and loose, adding the right organic amendments will improve its texture and the health of the plants growing in it.

Compost

Homemade compost is an ideal soil amendment. It’s locally produced to reduce your buying footprint, contains a rich blend of nutrients, and features bacteria your plants need to process those nutrients. A spinning bin can help you make compost in as little as three months out of food scraps and yard trimmings.

Leaf Mold

When leaves in the forest break down, they form a rich black mixture known as leaf mold. This blend creates pockets in the soil that let air and water through. If you have thick clay that acts like concrete after a rainstorm, a few giant piles of leaf mold can make an immediate difference in the texture. It’s also great for sandy soils because the particles act like tiny sponges to hold water where plant roots need it the most. Heavy duty black leaf bags allow you to turn your raked up piles into the decomposed format in one summer, or you can find it at most garden centers.

Aged Manure

Fresh manure is a no-no in the garden because nutrient levels are so high they hurt plants. Once that manure gets a chance to age and compost, it becomes a fertilizer and soil amendment all in one. Keep in mind that it acts as a nitrogen source for plants, so cut back on any other source of the nutrient when you add it to the soil.

Decomposed Materials

Finally, don’t forget about decomposed sawdust, straw, and wood chips. These materials suck nitrogen out of the soil when fresh, but become inert and ideal for loosening the soil after half a year or so of aging. The materials should crumble when rolled in the hand or you risk depleting your garden during the growing season. They all act similarly to leaf mold, but are often easier to find for free.

Categories
Lawn & Garden

Keep Your Garden Healthy: Tips for Natural Ways to Prevent Pests and Common Plant Diseases

After spending hours tilling and planting the garden, the last thing you want is for all of your plants to become pest infested and/or covered in fungus or powdery mildew. Applying pesticides will add harmful chemicals to your crops, the soil and future plantings as well as effect the flavor of your fruits and vegetables. There are a range of safe and natural things you can do to keep your current and future garden healthy.

Start With the Soil

The soil is the first place to begin controlling disease and insects in an organic garden. Using soil that is full of organic nutrients and matter will help your plants thrive and produce a healthy, productive crop. Insects and diseases thrive off of injured and weak plants, but when they are strong and healthy, garden plants have an ability to change their chemistry naturally in order to defend against its enemies. Things you can do to strengthen the soil include:

  • Adding compost materials to the soil before planting. Items such as egg shells will provide natural nutrients to the soil.
  • Always mulch the surface of the garden to help suppress weeds, protect soil erosion, increase earthworm activity and prevent slugs and snails from taking over. Leaves, straw, pine needles and grass clippings make excellent mulch for a garden.

Prevent Fungus 

The best way to fight fungus in the garden is by using natural items you probably already have in the kitchen. These simple remedies will help to safely and naturally keep out common problems, such as fungus and disease.

  • Apple cider vinegar is excellent for treating a range of plant diseases, such as black spots and powdery mildew. In a spray bottle, mix 3 tablespoons of apple cider vinegar with 2 quarts of water. Spray the infected plants with the solution when the temperatures are the coolest, such as in the morning or early evening. Avoid spraying the plants when there is direct sunlight on them and repeat daily until the condition is cured.
  • Milk is an ideal virus and fungus fighter for the garden. To prevent fungus, simply sprinkle a few tablespoons of powdered milk in the soil before planting. If you notice fungus on the leaves of plants, spray a mixture of equal parts of milk and water (1-cup milk and 1-cup water) directly on the infected leaves.
  • Baking soda is an excellent treatment for plant fungus. In a spray bottle, mix 1 tablespoon vegetable oil, a few drops of liquid, biodegradable dish-washing liquid and 1 tablespoon of baking soda. Spray the infected plants, including the base of the plant and the underside of leaves.

To help keep your garden healthy year after year, it is important to rotate the crops. Avoid overwatering plants, especially if you are noticing fungus or mildew. An excellent way to improve the health of your garden as well as try new garden foods, is with companion planting. Companion planting simply means arranging plants that are beneficial for each other. For example, planting a strong smelling herb near the vegetables will prevent insects from smelling the vegetable plants.

~Rene W.

Categories
Eco Tips Lawn & Garden

Growing, Using, and Preserving Fresh Herbs

When a recipe calls for dill, oregano, or basil, many cooks reach for a jar of commercially prepared, dried herbs in the pantry. However, to have the freshest, most delicious flavors, experienced cooks know that there is no substitute for fresh herbs. However, most home cooks use a wide variety of herbs, and buying them all from the supermarket could get expensive very quickly. One solution to fresh herb flavor without the expense is to grow your own herbs at home.

Growing Herbs

Thankfully, most herbs are simple to grow at home. A sunny spot and some average soil are all that are needed, along with a little effort. Basil, oregano, dill, parsley, cilantro, and mint are among the simplest herbs to grow. Start small the very first year so that you will not get overwhelmed.

Many herbs grow well from seeds, and this is an inexpensive way to get started. Basil, parsley, thyme, cilantro, and dill are good candidates for starting from seeds. However, perennial herbs like rosemary, chives, and fennel are slower growing. You will probably be happier with them if you buy them in small pots, already started.

Plant your herbs in a well-drained spot that gets six to eight hours of sunlight daily. Water them when the ground gets dry and pull weeds that pop up. Pay attention to the tags that come with the plants and space them appropriately.

Harvesting Herbs

When your herbs have established themselves, you can start snipping bits of the foliage for recipes. The peak of flavor is achieved right before the plants flower. You can prolong this period by snipping off the flower buds before they open. Never harvest more than one-third of the plant at once to avoid weakening the plant. Harvest the leaves from the outermost part of the plant, allowing the inner leaves to grow.

Storing and Preserving Herbs

If you have plenty of a particular herb, you can store the stems for about a week in a glass jar full of water in the refrigerator. Loosely cover the jar with a plastic bag to keep them fresh. Alternately, you can freeze fresh herbs and store them in zip-top baggies in the freezer. They will still be useful for flavoring but won’t be very good for garnishing. Last, herbs can be dried in a dehydrator or an oven on low heat. After drying, crumble the herbs and store them in jars with tightly-fitting lids.

~April F.

Categories
Featured Lawn & Garden

How to Make Soda Bottle Greenhouses

After you have grown your own veggies for a few years, you may be tempted to start your own seedlings. After all, a packet of vegetable seeds is much less expensive than a six-pack of vegetable seedlings, and you will get 25 or 30 seeds in each packet. Starting seedlings in peat pellets on a windowsill is fairly easy. However, if you don’t have a grow light, your seedlings will quickly become leggy. Most windowsills just do not have enough sunlight for a growing seedling, but the seedlings may not be quite ready for the outdoors. The weather of early spring can be notoriously fickle, and seedlings can freeze on an unexpectedly cold night or become damaged by an unexpected hailstorm.

Soda bottle greenhouses can help your seedlings grow tall and strong by allowing them to be outdoors with plentiful sunlight. However, they also provide protection from unexpected cold snaps and harsh spring storms. Additionally, they are an eco-friendly way of reusing trash that would end up in a landfill.

To make soda bottle greenhouses, you will need one empty soda bottle for each seedling, a craft knife, and potting soil. You can start your seedlings in peat pellets on your windowsill. Alternately, you can directly plant the seeds in the soda bottle greenhouse.

To make the greenhouse, first remove the label from the soda bottle and rinse any soda residue from the inside of the bottle. This sticky juice could attract ants; the ants will not damage your plants but will definitely be annoying.

Using the craft knife, pierce the bottom of the soda bottle to create a small drainage hole. Next, about halfway up the bottle, cut around the circumference of the bottle. Do not cut all the way around. You probably just need to cut about 85 percent of the way around the soda bottle. You can then fold back the top half of the bottle.

Fill the bottom half of the bottle with high-quality potting soil. Dampen the soil by pouring water into the dirt until it comes out of the drainage hole at the bottom of the bottle. Next, plant your seedling or seeds in the dirt.

Carefully move the top of the bottle back over the top of the seedling. Do not allow the plant’s leaves to become pinched in the plastic. Set your soda bottles outdoors in a sunny area. The soda bottle will protect the plant from cold weather and bad storms. You can leave the top of the bottle on if cold weather is an issue. However, if it gets hot, you will want to remove the lid to allow for ventilation and airflow. When the garden spot is ready and the last frost date for your area has passed, cut away the top of the soda bottle and plant your seedlings in the garden.

~April F.